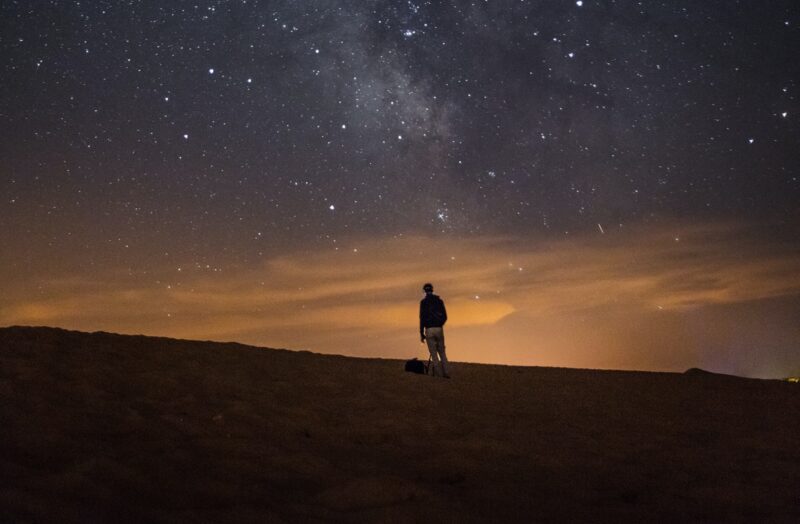
Night sky photography has long been out of reach for everyone except elite professional photographers — but not anymore. Thanks to incredible advancements in iPhone camera technology, anyone can try their hand at capturing the night sky and the Milky Way using an iPhone and a few additional tools and apps. Let’s get started.
Milky Way photography on iPhone
By default, the small sensor on your iPhone camera won’t capture the night sky as accurately as a DSLR, but there are ways to produce beautiful images using third-party apps. While you can’t change your iPhone’s camera hardware, you can improve the software by using an app that lets you control your camera’s shutter speed, ISO, and aperture.


How to take photos of the Milky Way with Slow Shutter Cam
Slow Shutter Cam is a premium iPhone app that lets you capture an array of slow shutter speed effects previously only available on a DSLR. Slow Shutter Cam features unlimited shutter speed and ISO control, a real-time preview, and a Low Light mode for night sky photography. The app is available for $1.99 on the App Store. In addition to the Slow Shutter Cam app, you will also need a tripod to keep your iPhone still while shooting.
Here’s how to capture the Milky Way using your iPhone and the Slow Shutter Cam app.
- Download Slow Shutter Cam
Open the app on your iPhone and give it permission to access your camera and photos.
- Choose a location
Find a location with good visibility and low light pollution to begin shooting. In the Northern Hemisphere, the best time to view the Milky Way is between April and July. Dark Sky Finder is a great app for locating dark-sky shooting locations near you.
- Adjust the settings in Slow Shutter Cam
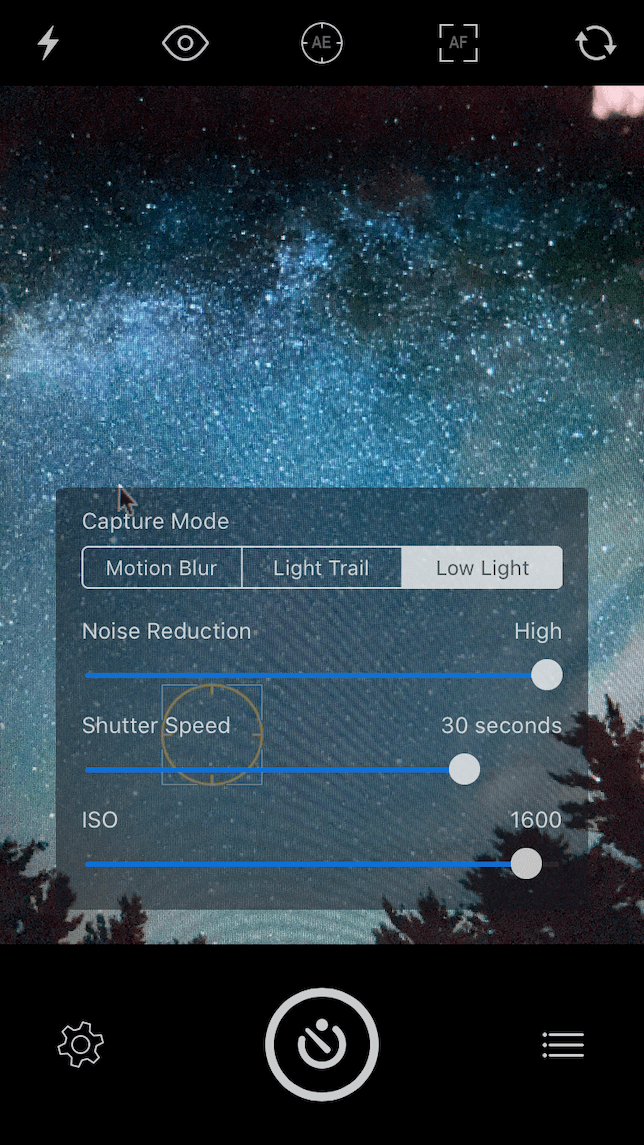
Set the shooting mode to Low Light, then slide the Noise Reduction slider to High, the Shutter Speed to 25 seconds, and the ISO to 1600.
- Mount your iPhone on a tripod
This is the best way to eliminate camera shake for long exposures.
- Set the camera timer
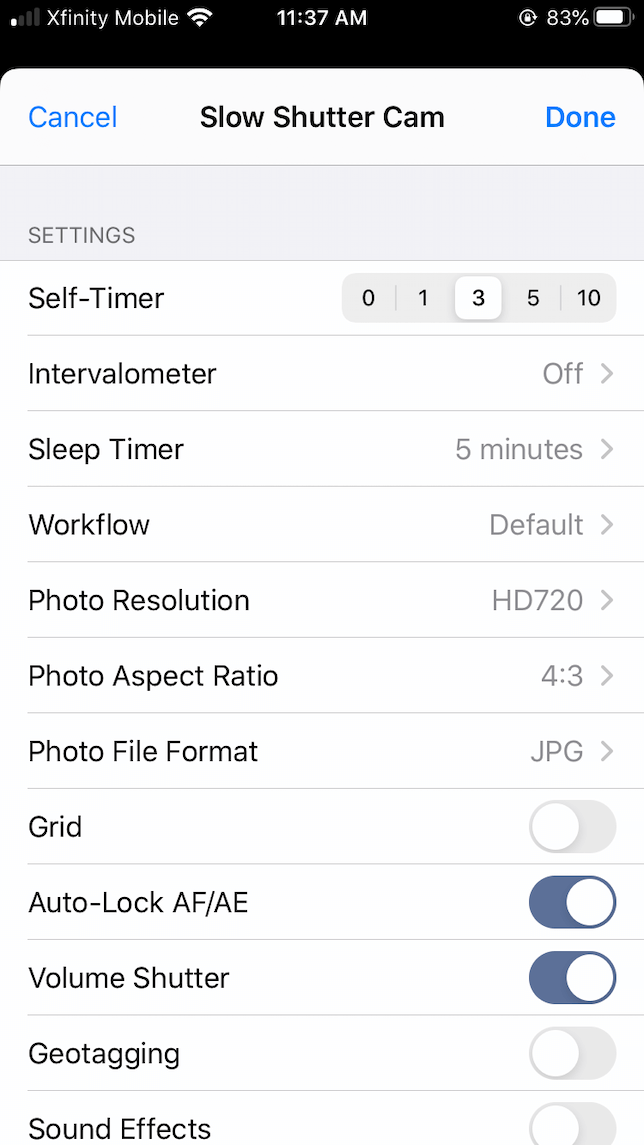
Tap the menu in the lower-right corner and set the timer for 3 seconds. This will further reduce camera shake.
- Take a photo
Tap the shutter button. A white bar will appear around the shutter button to indicate your progress. Do not touch the camera until it is finished.
- Save your photo
Above the shutter button, you will see three options: Clear, Edit, and Save. If you’re happy with your photo, tap Save. Tap Clear to erase your photo and try again.
Star and star trail photography with your iPhone
So far, we haven’t discovered a free app for iPhone that successfully captures stars or star trails, but Slow Shutter Cam is an inexpensive option at $1.99. Another great app for photographing stars is NightCap, which is available on the App Store for $2.99.
How to take pictures of stars with NightCap
NightCap is another powerful app that specializes in low-light and night photography. Dedicated astronomy modes make it easy to capture the stars, the northern lights, and light trails. NightCap’s secret is to use stacking technology to take multiple photos and then combine them into one perfectly exposed shot, no matter how low the light. To take photos of stars with your iPhone using the following instructions, you will need the NightCap app, which is available for $2.99 on the App Store, and a tripod to mount your phone.
- Download NightCap and open it on your iPhone.
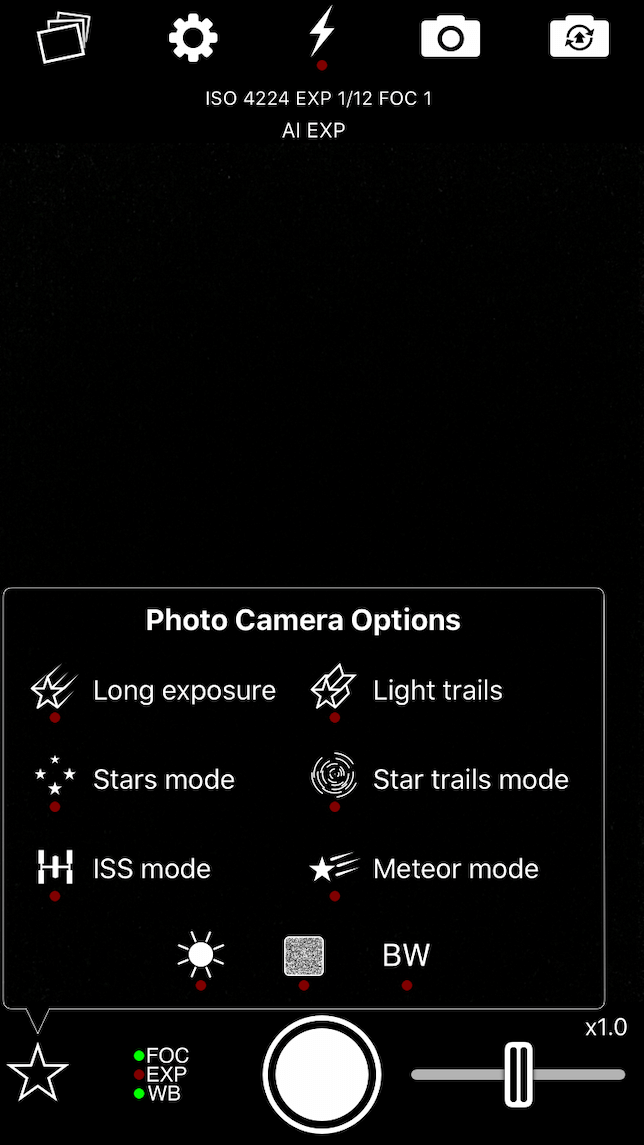
- Tap the star icon at the bottom of your screen and choose Stars Mode.
- To enable light boost, which will increase how much light hits your camera’s sensor, tap the sun icon.
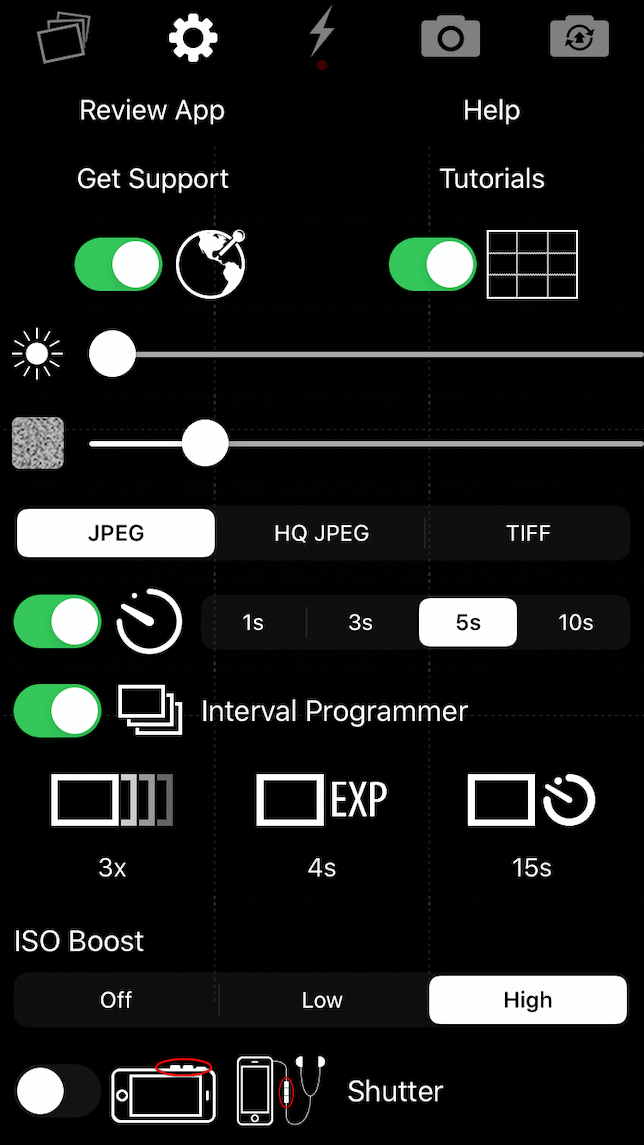
- Tap the settings icon to set the exposure and noise reduction levels. Set ISO Boost to High.
- Securely attach your iPhone to a tripod and frame your shot.
- Press the shutter button. NightCap will use an automatic timer to minimize shake and will shoot for 15 seconds. The app will automatically utilize a timer to minimize shake and will shoot for about 10 seconds.
- Your photo will be added to your photo library.
How to photograph star trails with Slow Shutter Cam
Once you’ve practiced a bit with night sky photography, you’ll be ready to experiment with photographing star trails. Capturing star trails requires that you leave your shutter open for at least 30 seconds. This is enough time to capture the movement of the stars — or, more accurately, the movement of the earth. Stars will appear as trails curving across the sky, making for an incredibly striking image.
Ready to give it a shot? Here’s how to photograph Star trails using Slow Shutter Cam.
- Download Slow Shutter Cam and open it on your iPhone.
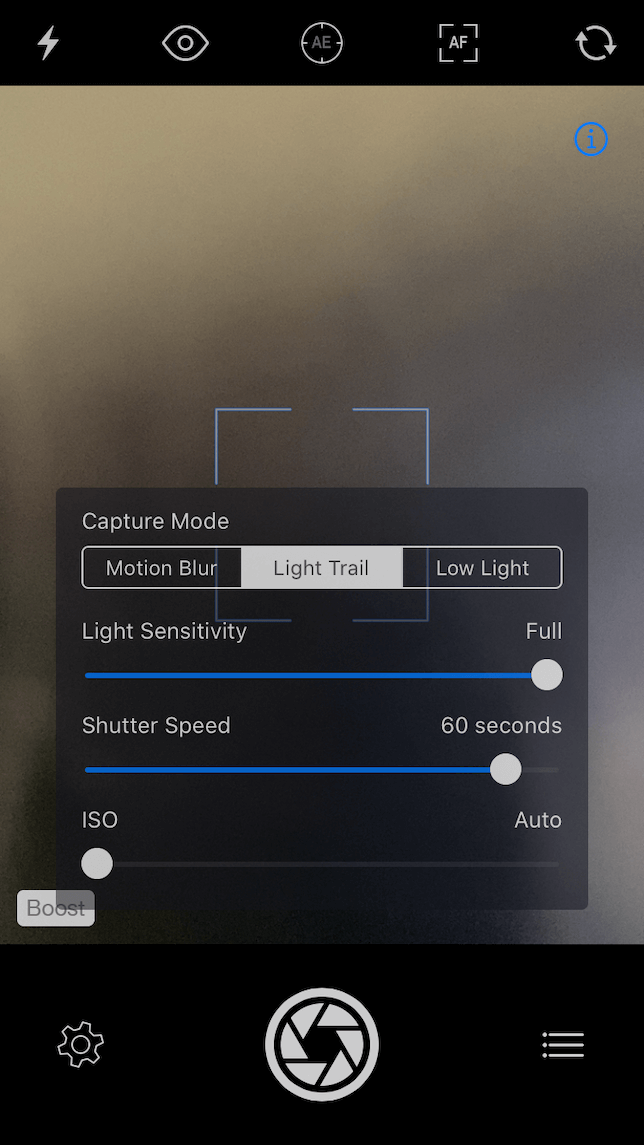
- Tap the settings icon to open the camera settings.
- Set your Capture Mode to Light Trail, set Light Sensitivity to Full, and adjust Shutter Speed to 60 seconds. ISO can be set to Auto.
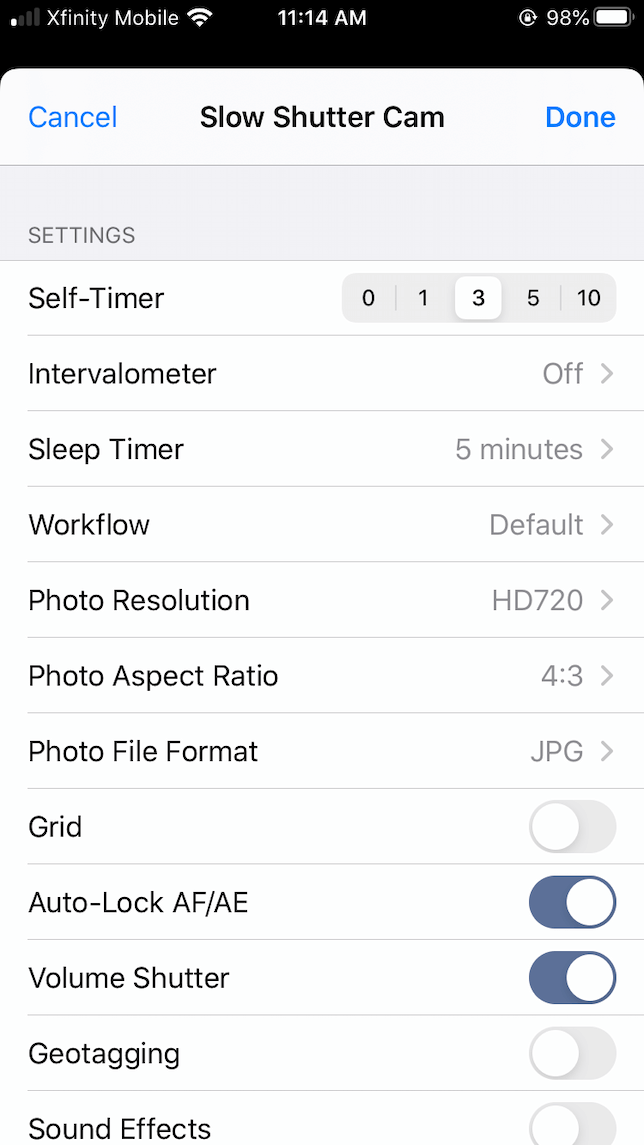
- Tap the menu icon and add a self-timer set to 3 seconds to reduce camera shake.
- Attach your iPhone to a tripod and frame your shot.
- Tap the shutter button and wait for the camera to finish capturing the scene.
- Choose Clear, Edit, or Save based on your preferences.
How to edit star trail photos with Lightroom for iOS
Lightroom is a mobile photo editing app that is free to download and use. There are several premium options available at different price points. If you use Adobe Lightroom for desktop, the premium plan for the app is included in your subscription.
Ready to try your hand at editing star trail photos? Here’s a simple method using the Lightroom app.
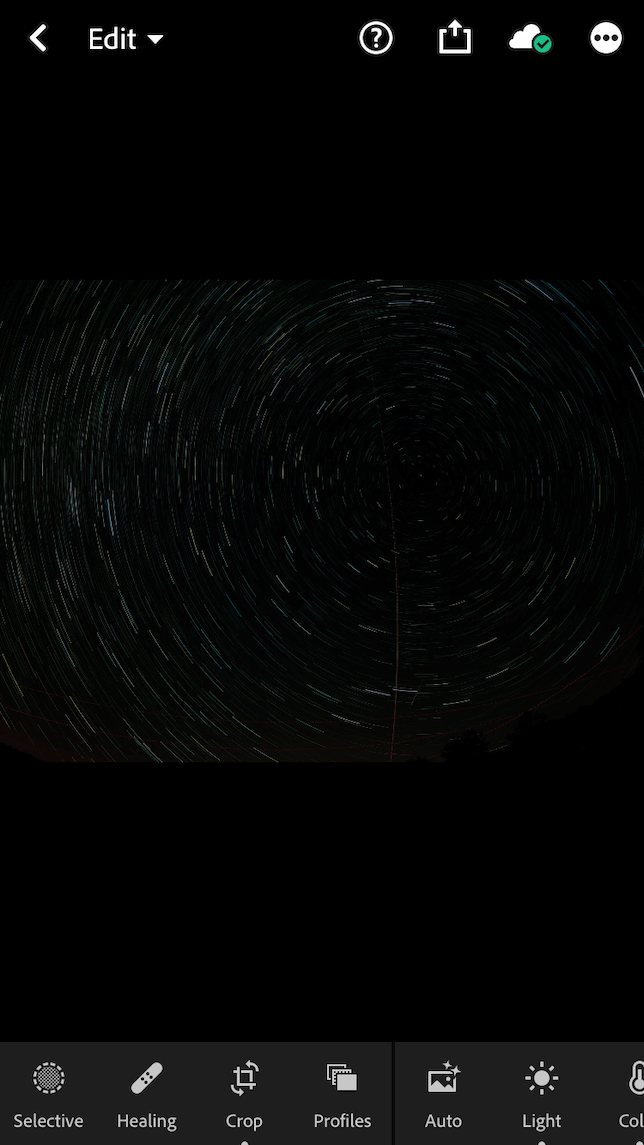
- Download Adobe Lightroom and open it on your iPhone.
- Upload a photo by tapping the blue pop-up menu featuring a photo with a + next to it.
- Choose the star trail photo you want to edit.
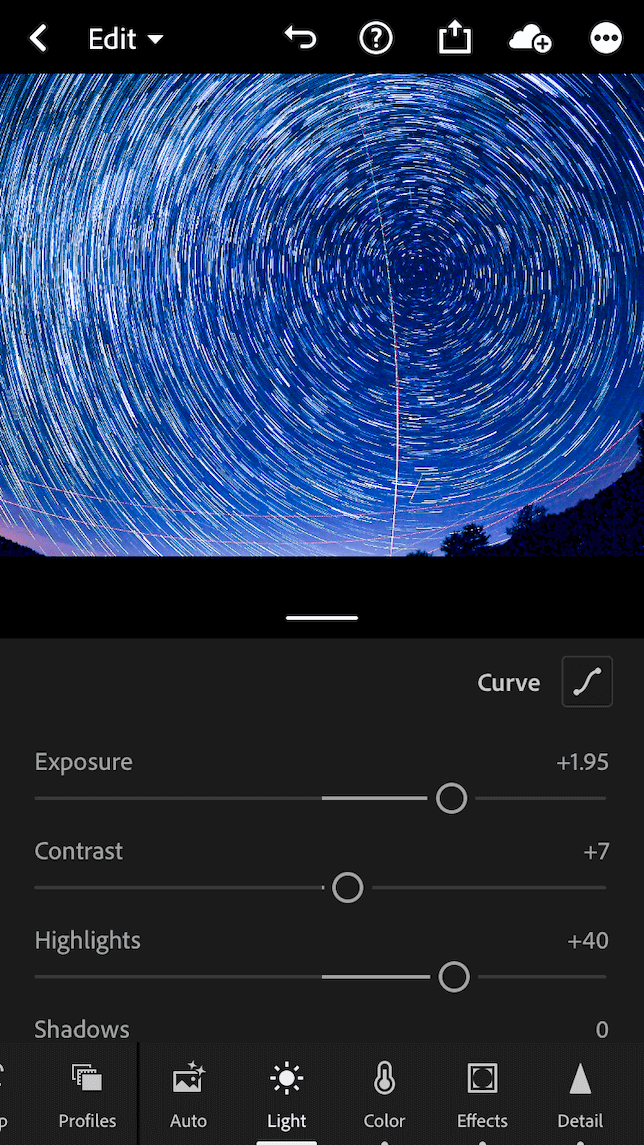
- Tap Light at the bottom of the screen.
- Move the Exposure slider to the right to increase the brightness of your star trails.
- Slide the Contrast to the right to increase the contrast between the star trails and the dark sky.
- Move the Highlights slider to the right to increase the highlights in the star trails.
- Tap Color.
- Adjust the Temp and Tint sliders to make subtle or drastic changes to the colors of your star trails.
- When you are happy with the results, tap the upload icon to save your edited star trail photo to your photo library.
Best tips for star photography
Like any photography technique, your Milky Way and star trail shots will improve with practice. Here are some pro tips to help you get there faster, no matter which iPhone you’re using:
- Always use a tripod. In order to take long exposure shots, you need to keep your camera as still as possible. The best way to do this is with a tripod and a self-timer so you aren’t touching your phone when shooting.
- Find the darkest sky possible. Light pollution can be a huge problem when trying to capture the night sky. The Dark Sky Finder app will help you find great spots for star watching and night sky photography.
- Use a timer or a shutter release. When taking a picture, either set your self-timer on your phone or use a remote shutter release to eliminate camera shake. Check out this guide to iPhone camera accessories to pick the best shutter release and tripod.
- Never use digital zoom. Newer iPhones include several lenses that change the focal length of your camera. These are great tools for finding the right composition. But do not use your iPhone’s digital zoom, which uses internal software to zoom in on a scene. This will drastically reduce the quality of your image.
- Implement noise reduction. Low-light photography will almost always introduce noise into your images, making them appear grainy. You can reduce noise with Lightroom by tapping Detail and scrolling down to the Noise Reduction slider.
- Don’t compete with the moon. When shooting stars and star trails, you want a clear night with a very dark sky. If the moon is high and bright, it will interfere with your photography of the stars. Want to capture the moon in your photos? We’ll cover that next.
Moon and night sky photography with an iPhone
iPhone 11 and newer models are equipped with a special Night Mode that can be used in conjunction with iPhone’s wide-angle and telephoto camera lenses. These lenses have large sensors that let in more light for crisp, clear night photography.
How to take better photos of the moon with Night Mode
Night Mode on the iPhone is designed to work automatically when the lighting conditions deem it necessary. To capture the moon, use a tripod to frame your shot and follow these instructions:
- Open your iPhone’s Camera app.
- In low-light settings, Night Mode will be enabled.
- Tap the moon icon in the upper-left corner of your screen.
- Use the slider to adjust the length of your exposure. One to two seconds is great for shooting the moon, but don’t be afraid to experiment.
- Use the self-timer or a remote shutter to take your photo.
Ready to jump-start your night photography? Invest in a tripod and a few of the apps we’ve mentioned, and get ready to explore the fascinating world of iPhoneography after dark.
