Regardless of what model of iPhone you have, it’s safe to say it has a pretty good camera. In fact, the camera has always been impressive on iPhone. And it only gets better with every new model Apple releases. After you’ve had a chance to test your new phone’s camera, you’ll want to transfer photos from iPhone to your PC — whether it’s because you want to share them with family and friends, print them out, or simply view them on a larger screen.
Thankfully, iPhone is just as friendly with Windows computers as it is with Macs. Read on to see how you can transfer your pictures via your USB cable or by using a cloud service like iCloud.
Before you transfer photos from your iPhone
f you’re dealing with a massive photo library, transferring it in full or finding specific photos to delete can be time-consuming. However, with CleanMy®Phone, you can efficiently clean up your photo library. This app scans your digital storage for duplicates, blurry pictures, screenshots, and other clutter, helping you trim a few gigabytes off your photo collection before transferring it, saving you valuable time.
To clear all the unneeded photos, download CleanMy®Phone and follow these steps:
- Launch CleanMy®Phone and grant it access to your photos.
- From the Declutter tab, tap Scan.
- The app will categorize your photo clutter, putting them into folders like Duplicates, Blur, Instagram, Screen Recordings, etc.
- Tap any of the folders and review the images.
- Deselect any photo you’d like to keep and tap Clean.


How to transfer photos from an iPhone to a PC with iTunes
Even though you won’t be opening iTunes to transfer pictures from your iPhone to your computer, you’ll still need to have it installed in order for your iPhone to be properly recognized when you plug it in.
If your computer already has iTunes installed, you can follow the steps below. Otherwise, you’ll need to download iTunes and install it beforehand.
- Connect your iPhone to your PC.
- Unlock your iPhone and tap Trust This Computer.
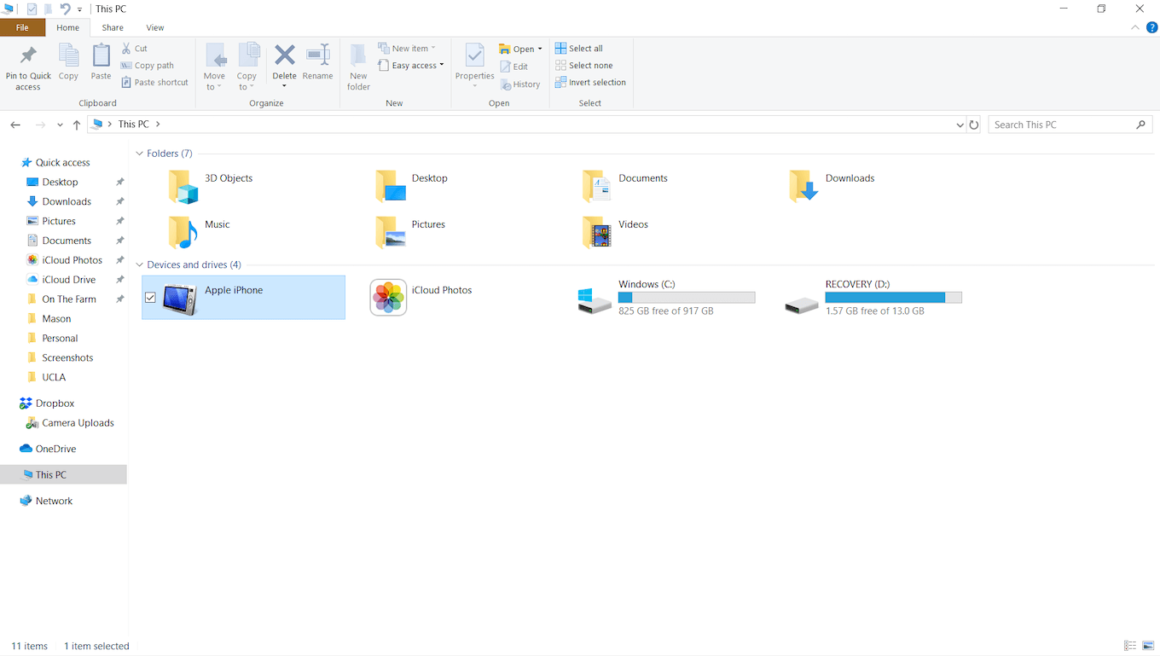
- In Windows 7, go to My Computer, or in Windows 10, go to This PC.
- Your iPhone should appear under either Portable Device or Devices.
- Click iPhone > DCIM.
- Select the pictures and videos you want, then drag and drop them into the folder where you want to save them.

While you certainly can use this method to transfer your entire photo library from your iPhone, you might find it more convenient if you only want to transfer select pictures or videos.
How to transfer photos from an iPhone to a PC without iTunes
Fortunately, iTunes isn’t the only way to transfer your iPhone pictures to your computer. If your computer has Windows 10 installed, you can use the Windows Photos app that comes with the operating system. Or you can wirelessly transfer all of your pictures and videos using your iCloud account.
How to import photos from an iPhone to a PC with Windows Photos
Similar to transferring pictures with File Explorer, Windows Photos requires you to connect your iPhone to your PC physically. But Windows Photos makes it a little easier to move new pics and videos, and it will help manage your entire photo library on your computer.
To get started, plug your iPhone into your computer with your USB cable and follow the steps below:
- On your PC, open Windows Photos.
- In the top-right corner, click Import > From a USB device.
- Your photos should be ready to be imported.
- Select or deselect photos, depending on what you want to import.
- Click Continue.

And that’s it! Just let the transfer finish and don’t unplug your iPhone until it has completed.
How to sync iPhone photos to a PC using iCloud
If you have an iCloud account, you can sync all of the pictures you take with your iPhone to your computer without ever having to plug it in. First, you need to make sure iCloud Photo is enabled on your iPhone.
- Go to Settings.
- Tap on your name > iCloud > Photos.
- Switch on iCloud Photos.
Now you need to get iCloud set up on your PC.
- Download and install iCloud for Windows.
- Restart your PC.
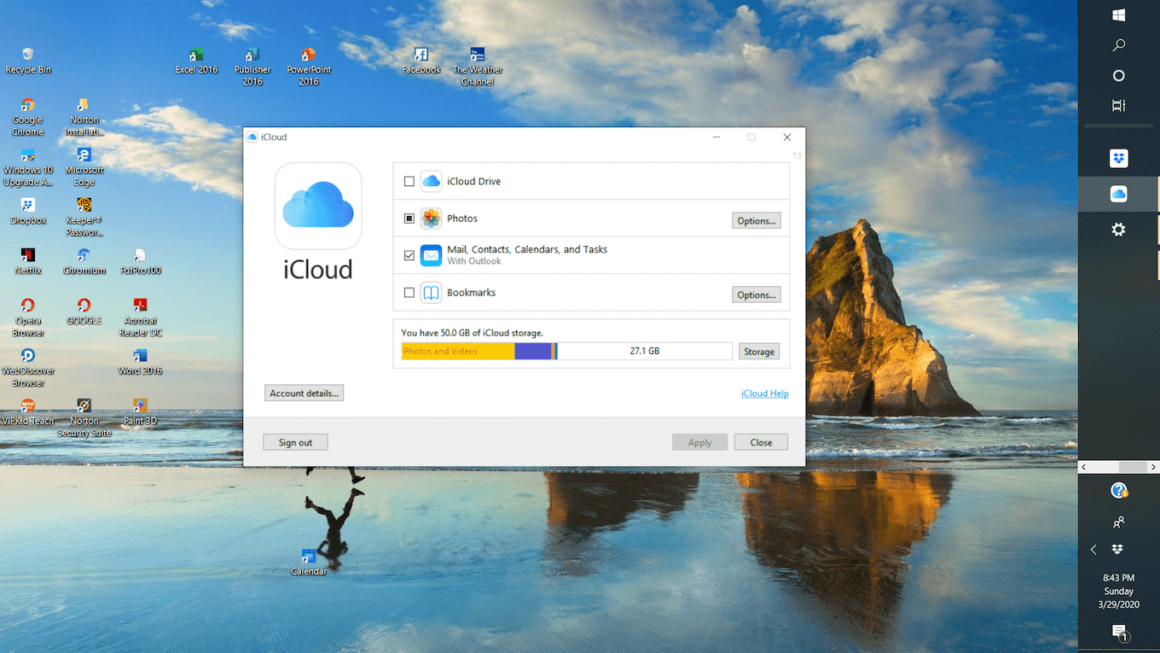
- Open iCloud for Windows.
- Sign in to iCloud with your Apple ID.
- Check the box next to Photos.
- Click Apply.

Depending on how large your photo library is, this process can take some time. The good news is that the first time will be the longest because it’s syncing your entire library. As long as you keep these settings turned on, your PC will automatically update your library as you take new pictures with your iPhone. And if you need to transfer photos from your Mac or PC to your iPhone, iCloud will work as well, as it will sync your photo library across all linked device.
Transferring pictures from your iPhone to your computer couldn’t be easier — even if you’re using a Windows computer. And like most things iPhone-related, there are several ways you can go about it. Hopefully, you found the method above helpful and you’re now keeping your photo library on both your computer and your iPhone entirely in sync.


